Having questions about which NoSQL to use?
Check this out:
http://jaxenter.com/evaluating-nosql-performance-which-database-is-right-for-your-data.1-49428.html
Monday, August 04, 2014


Wednesday, June 18, 2014
Connect Informatica to ActiveMQ as a durable subscriber
I was asked to give advice on how to use Informatica to subscribe to a durable topic hosted on ActiveMQ.
It's quite easy to make a Java subscriber durable. The tricky thing related to Informatica subscriber is that this has to be configured inside Informatica while how the configuration should be done is somehow defined by JMS providers.
In order to connect to ActiveMQ durable topic, both subscriber name and clientid are required to be provided by subscribers. Subscriber name can be configured in Informatica JMS adapter (as the data source) however besides that it doesn't allow people to set the clientid. So the first thing came to my mind was to set the clientid on connectionfactory. But it didn't work by adding clientid as a property to connectionfactory.
An alternative is to modify the connection url of Informatica connection. In the end, it proved to work by appending "?jms.clientID=xxinf" to the url. A lot more attributes can be appended to the url; details are described here: http://activemq.apache.org/connection-configuration-uri.html .
It's quite easy to make a Java subscriber durable. The tricky thing related to Informatica subscriber is that this has to be configured inside Informatica while how the configuration should be done is somehow defined by JMS providers.
In order to connect to ActiveMQ durable topic, both subscriber name and clientid are required to be provided by subscribers. Subscriber name can be configured in Informatica JMS adapter (as the data source) however besides that it doesn't allow people to set the clientid. So the first thing came to my mind was to set the clientid on connectionfactory. But it didn't work by adding clientid as a property to connectionfactory.
An alternative is to modify the connection url of Informatica connection. In the end, it proved to work by appending "?jms.clientID=xxinf" to the url. A lot more attributes can be appended to the url; details are described here: http://activemq.apache.org/connection-configuration-uri.html .
Wednesday, March 12, 2014
Implement pagination in JSF 2.x with Primefaces
Primefaces provids LazyDataModel which you can bind with DataTable object to provide very powerful pagination functionalities in the UI, including customizable pagination buttons, sorting functions, and multiple query criteria, and so on.
The way to use it is not difficult but there's not much information about it you can find in the documentation. The best starting point is to check the Primeface showcase at http://www.primefaces.org/showcase/ui/datatableLazy.jsf .
Steps to implement the support for LazyDataModel with JSF2.x can be briefly described as follows:
You can get some examples with EJB or DAO in the internet. But I didn't find much information on how to implement it with the setup of JSF2 and JPA. The tricky part is normally people inject JPA execution logic (query, update entities) into JSF managed beans, for example, PrimeBackingBean in our case. Such injection won't work for ChildLazyDataModel, as ChildLazyDataModel is not a container-manageable yet. I didn't try the option to make it container-manageable object yet. Instead, I used an easier alternative:
The way to use it is not difficult but there's not much information about it you can find in the documentation. The best starting point is to check the Primeface showcase at http://www.primefaces.org/showcase/ui/datatableLazy.jsf .
Steps to implement the support for LazyDataModel with JSF2.x can be briefly described as follows:
- Implement a child class (Let's call it ChildLazyDataModel) of LazyDataModel
with one @Override method List load(int first, int pagesize, String sortfield, SortOrder sortorder, Map filters). This method will be invoked whenever pagination happens. Inside the method, 2 pieces of logic should be implemented: - The total result count should be set on the datamodel.
- The result should be returned from the query.
- Build the JSF backing bean in the way that it contains an instance of ChildLazyDataModel. Let's call it PrimeBackingBean. The getter of the lazy data model will return a new instance.
- Bind the ChildLazyDataModel variable from PrimeBackingBean with the Primeface datatable object in the JSF files.
You can get some examples with EJB or DAO in the internet. But I didn't find much information on how to implement it with the setup of JSF2 and JPA. The tricky part is normally people inject JPA execution logic (query, update entities) into JSF managed beans, for example, PrimeBackingBean in our case. Such injection won't work for ChildLazyDataModel, as ChildLazyDataModel is not a container-manageable yet. I didn't try the option to make it container-manageable object yet. Instead, I used an easier alternative:
- Inject the JPA execution bean into PrimeBackingBean.
- Implement the constructor for ChildLazyDataModel with the parameter of JPA execution bean. The JPA execution bean instance can be used to do all the required queries.
- In the getter for the lazy data model of PrimeBackingBean, instantiate new lazy data model by passing the injected JPA execution bean using the new constructor.
Friday, March 07, 2014
Injecting EJB into JAX-RS service
Java EE 6 introduced dependency injection mechanism, which makes it extremely easy to instantiate bean objects and pass the reference to other java services.
Injecting EJB into web services, servlets or EJBs can be easily done by using @javax.ejb.EJB annotation.
However, it doesn't work in the same way for JAX-RS services. Server would report NPE if @EJB annotation is used to inject EJB instance. The reason is that JAX-RS services are not managed beans.
An easy way to fix it is to make the JAX-RS service a stateless session bean by annotating it with @javax.ejb.Stateless.
A better alternative is to make JAX-RS service a managed bean. Detailed steps are as follows:
1. Add an empty beans.xml to WEB-INF directory. The purpose of this is to indicate that the web application is JCDI enabled.
2. Add a no-argument constructor to the JAX-RS service class. This makes the service class a JCDI bean. If some properties need to be set with some values (from http headers, for example.), it can be done inside the @javax.annotation.PostConstruct method.
3. Annotate the JAX-RS service class with @javax.enterprise.context.RequestScoped. This defines the service has http request scope.
4. Inject EJB instance with @javax.inject.Inject annotation.
Injecting EJB into web services, servlets or EJBs can be easily done by using @javax.ejb.EJB annotation.
However, it doesn't work in the same way for JAX-RS services. Server would report NPE if @EJB annotation is used to inject EJB instance. The reason is that JAX-RS services are not managed beans.
An easy way to fix it is to make the JAX-RS service a stateless session bean by annotating it with @javax.ejb.Stateless.
A better alternative is to make JAX-RS service a managed bean. Detailed steps are as follows:
1. Add an empty beans.xml to WEB-INF directory. The purpose of this is to indicate that the web application is JCDI enabled.
2. Add a no-argument constructor to the JAX-RS service class. This makes the service class a JCDI bean. If some properties need to be set with some values (from http headers, for example.), it can be done inside the @javax.annotation.PostConstruct method.
3. Annotate the JAX-RS service class with @javax.enterprise.context.RequestScoped. This defines the service has http request scope.
4. Inject EJB instance with @javax.inject.Inject annotation.
Monday, March 03, 2014
Handle NTLM authentication with HttpClient v4.0.1 (Websphere application server v8.5)
I tried to use Apache HttpClient v4.3.3 in one of my jax-rs service implementation, which is deployed to websphere applciation v8.5.
However, the code always reported the issue that the INSTANCE field is not present in BasicLineFormatter class. It turned out that in one of the plugin jar file of WAS (com.ibm.ws.prereq.jaxrs.jar), the old version of HttpClient is included. According to the version properties file, the version is 4.0.1.
The problem came because HttpClient v4.0.1 doesn't support NTLM authentication, which is required for my service. I had to find a way to change the order of class loading of the web application. I tried a few options such as making the class loading using "parent last", adding the library to JRE path, and so on. None of them worked out.
Eventually I had to go with the v4.0.1 version which is shipped with WAS v8.5. Information provided on http://hc.apache.org/httpcomponents-client-4.3.x/ntlm.html is mostly correct, except that it applies with v4.3.3. Here's the instruction for using SAMBA JCIFS with v4.0.1:
1. Create NTLMEngine with the instructions on http://hc.apache.org/httpcomponents-client-4.3.x/ntlm.html .
2. Implement AuthSchemeFactory instead of AuthSchemeProvider for v4.3.3.
Normally sharepoint site use SSL for communication. The client certificate needs to be imported into the truststore of WAS. Otherwise, "SSL HANDSHAKE FAILURE" will be reported.
However, the code always reported the issue that the INSTANCE field is not present in BasicLineFormatter class. It turned out that in one of the plugin jar file of WAS (com.ibm.ws.prereq.jaxrs.jar), the old version of HttpClient is included. According to the version properties file, the version is 4.0.1.
The problem came because HttpClient v4.0.1 doesn't support NTLM authentication, which is required for my service. I had to find a way to change the order of class loading of the web application. I tried a few options such as making the class loading using "parent last", adding the library to JRE path, and so on. None of them worked out.
Eventually I had to go with the v4.0.1 version which is shipped with WAS v8.5. Information provided on http://hc.apache.org/httpcomponents-client-4.3.x/ntlm.html is mostly correct, except that it applies with v4.3.3. Here's the instruction for using SAMBA JCIFS with v4.0.1:
1. Create NTLMEngine with the instructions on http://hc.apache.org/httpcomponents-client-4.3.x/ntlm.html .
2. Implement AuthSchemeFactory instead of AuthSchemeProvider for v4.3.3.
3. Use the following code as an example to register the AuthSchemeFactory and create NTLM credential :public class JCIFSNTLMSchemeFactory implements AuthSchemeFactory {@Overridepublic AuthScheme newInstance(HttpParams arg0) {return new NTLMScheme(new JCIFSEngine());}}
DefaultHttpClient httpclient = new DefaultHttpClient();
httpclient.getAuthSchemes().register("ntlm",new JCIFSNTLMSchemeFactory());
CredentialsProvider credsProvider = new BasicCredentialsProvider();
NTCredentials ntcred = new NTCredentials(username, password,
InetAddress.getLocalHost().getHostName(), domain);
credsProvider.setCredentials(new AuthScope(hostname, port,
AuthScope.ANY_REALM, "NTLM"), ntcred);
httpclient.setCredentialsProvider(credsProvider);In this way, the NTLM support is done on WAS v8.5.
Normally sharepoint site use SSL for communication. The client certificate needs to be imported into the truststore of WAS. Otherwise, "SSL HANDSHAKE FAILURE" will be reported.
Wednesday, December 04, 2013
Pydev defect with Django 1.6?
In Pydev 3.0 Django menu, you can start the shell with current project path included.
However, when using this functionality with Django 1.6 project, the following error will be thrown:
In order to fix the issue, you just need to run the following statement:
from django.core import management;import tutorial.settings as settings;management.setup_environ(settings) Traceback (most recent call last): File "It turned out that module setup_environ was removed from django.core.management in v1.6 while pydev still calls this module.", line 1, in AttributeError: 'module' object has no attribute 'setup_environ'
In order to fix the issue, you just need to run the following statement:
os.environ['DJANGO_SETTINGS_MODULE'] = '(project).settings'Please replace (project) with your django project name.
Wednesday, November 20, 2013
ssh tunnel, a small but useful trick to bypass firewalls
I used to use ssh tunnel a lot during college times. It proved still very very useful in my work.
It's not a trick that most developers know that's why I'm going to give a brief explanation here.
What usually happens during enterprise application development is that some services exposed over Internet are protected by firewalls, which are configured to only accept communications from certain servers via pre-defined ports.
Here's a real-world scenario I experience in mutiple projects:
1. Development team works on their desktops/laptops with a bunch of development tools. And they also have ssh access to development servers (Linux based).
2. There are some message queue services, or SMTP service exposed only to development servers.
3. Developers want to know what happens to the queue (to check whether the queue manager is working fine, and to do peek, enqueue, dequeue operations) but they cannot access the internet-based queue services from their desktops directly. Also it's not recommended (sometimes forbidden) to use GUI applications such as vnc to access development server. It's also a bit more complex for everyone to use shell script in development server to performance development activities.
In order for developers to access the service from their own desktops, only ssh tunnel needs to be configured. Local port forwarding does the work and makes sure to forward all communications of a pre-defined local port to a certain target via ssh tunnel.
In our scenario, suppose we use local port 9000 as the port to be forwarded. Suppose our dev server is named "devserver" and the remote queue service is on "qservice" with port 1515. We need to configure to forward communications of localhost:9000 to qservice:1515 via "devserver".
In practice, this can be done easily by putty with the following 2 steps:
1. Start putty and select the ssh session to access devserver. (Don't login yet)
2. In the putty left-side menu, select connection --> SSH --> Tunnels, then "Add new forwarded port" using the following value: Source port: 9000, Destination: qservice:1515, Local. After this, you can login to the dev server.
What above steps do is starting a local process which opens a ssh tunnel with devserver, and also listens to localhost port 9000, whenever their's any data received, it'll forward the data to qservice from the devserver via the ssh tunnel. As a result, developers can connect to local 9000 port to use the queue service.
What usually happens during enterprise application development is that some services exposed over Internet are protected by firewalls, which are configured to only accept communications from certain servers via pre-defined ports.
Here's a real-world scenario I experience in mutiple projects:
1. Development team works on their desktops/laptops with a bunch of development tools. And they also have ssh access to development servers (Linux based).
2. There are some message queue services, or SMTP service exposed only to development servers.
3. Developers want to know what happens to the queue (to check whether the queue manager is working fine, and to do peek, enqueue, dequeue operations) but they cannot access the internet-based queue services from their desktops directly. Also it's not recommended (sometimes forbidden) to use GUI applications such as vnc to access development server. It's also a bit more complex for everyone to use shell script in development server to performance development activities.
In order for developers to access the service from their own desktops, only ssh tunnel needs to be configured. Local port forwarding does the work and makes sure to forward all communications of a pre-defined local port to a certain target via ssh tunnel.
In our scenario, suppose we use local port 9000 as the port to be forwarded. Suppose our dev server is named "devserver" and the remote queue service is on "qservice" with port 1515. We need to configure to forward communications of localhost:9000 to qservice:1515 via "devserver".
In practice, this can be done easily by putty with the following 2 steps:
1. Start putty and select the ssh session to access devserver. (Don't login yet)
2. In the putty left-side menu, select connection --> SSH --> Tunnels, then "Add new forwarded port" using the following value: Source port: 9000, Destination: qservice:1515, Local. After this, you can login to the dev server.
What above steps do is starting a local process which opens a ssh tunnel with devserver, and also listens to localhost port 9000, whenever their's any data received, it'll forward the data to qservice from the devserver via the ssh tunnel. As a result, developers can connect to local 9000 port to use the queue service.
Thursday, November 07, 2013
GAE application behaves abnormally after deployment
I've been playing with Flickr API with a GAE webapp.
To maximize the performance, I didn't use some framework to build it. Basic APIs such as http connections are used to handle the communication.
The small app has been auto-tested thousands of times on local GAE run-time, and it's working fine totally. And no GAE datastore is used for this app (hence no datastore indexes need to be generated); I expect the app to work fine after a successful deployment.
However I faced the issue that 45% of the http request gave the same error message, complaining the invalid format of the data stream (returned from Flickr REST service). From the debug message trace, it turned out almost half of the requests, which are supposed to get data in JSON format (by setting JSON format as one of the query parameters), got routed to flickr API community guidelines page, resulting in that irrelevant data in html format was returned, although every time the HTTP GET was requested towards the same Flickr url.
I did some googling, and was not able to find out why this happened. I was thinking probably Flickr partially blocked/redirected requests from google (GAE) because it was a Yahoo company. Not sure about that. On the second day, I just tested the same app again. It works totally fine again, just as what I experienced with the local GAE run-time. It seems there's always a delay before a newly deployed GAE app to behave properly.
This is a Java app; I'll check if Python app behaves similarly.
To maximize the performance, I didn't use some framework to build it. Basic APIs such as http connections are used to handle the communication.
The small app has been auto-tested thousands of times on local GAE run-time, and it's working fine totally. And no GAE datastore is used for this app (hence no datastore indexes need to be generated); I expect the app to work fine after a successful deployment.
However I faced the issue that 45% of the http request gave the same error message, complaining the invalid format of the data stream (returned from Flickr REST service). From the debug message trace, it turned out almost half of the requests, which are supposed to get data in JSON format (by setting JSON format as one of the query parameters), got routed to flickr API community guidelines page, resulting in that irrelevant data in html format was returned, although every time the HTTP GET was requested towards the same Flickr url.
I did some googling, and was not able to find out why this happened. I was thinking probably Flickr partially blocked/redirected requests from google (GAE) because it was a Yahoo company. Not sure about that. On the second day, I just tested the same app again. It works totally fine again, just as what I experienced with the local GAE run-time. It seems there's always a delay before a newly deployed GAE app to behave properly.
This is a Java app; I'll check if Python app behaves similarly.
Friday, October 25, 2013
Variable placeholder conflict between AngularJs and Jinja2 template
It's quite common that in web page templates (diango or jinja2 templates) brackets "{{}}" are used as placeholders for template variables.
When people want to use angularjs in those template files, angularjs might not work properly because it also uses "{{}}" to bind data model.
A workaround for this is to redefine the templates; an example for Jinja2 template is as follows:
JINJA_ENVIRONMENT=jinja2.Environment( loader=jinja2.FileSystemLoader(os.path.dirname(__file__)), extensions=['jinja2.ext.autoescape'], variable_start_string='((', variable_end_string='))', autoescape=True)After this step is done, in the template files, "(())" refers to template variables, and "{{}}" refers to AngularJs data model.
Monday, August 19, 2013
DGrid data refreshing event?
I'm working on dojo chart generation based on the data from dojo dgrid.
The logic I'm building is as follows:
1. Subscribe to a topic in the main page:
connect.subscribe("dgridrefresh", mModule.generateRestChart);
2. Initiate a JsonRest datastore. Use the datastore to create a dgrid with pagination plugin.
3. Start the dgrid in some contentpane.
4. Publish an event to a topic upon "dgrid-refresh-complete" event.
The code is as follows (topicname is the paramter):
dgrid.on("dgrid-refresh-complete", function(event) {
console.log("refresh-complete. Publishing to " + topicname);
require(["dojo/_base/connect"], function(connect) {
connect.publish(topicname, [event]);
});
});
However, I observed that mModule.generateRestChart() function was only invoked once when the dgrid was initiated. I expect the method being called whenever pagination is executed.
Same information is here:http://dojo-toolkit.33424.n3.nabble.com/get-data-refresh-notification-from-dgrid-with-jsonrest-datastore-td3998670.html
In the end, it turned out the dgrid-refresh-complete event will only be emitted once when dgrid is refreshed with loading the first page of data.
I did a workaround by customizing the pagination plugin for dgrid. The change I made was pretty simple: inside the Deferred block of gotoPage method of dgrid.extensions.Pagination, I added another emit of dgrid-navigation-complete event, which is a customized event by myself.
The logic I'm building is as follows:
1. Subscribe to a topic in the main page:
connect.subscribe("dgridrefresh", mModule.generateRestChart);
2. Initiate a JsonRest datastore. Use the datastore to create a dgrid with pagination plugin.
3. Start the dgrid in some contentpane.
4. Publish an event to a topic upon "dgrid-refresh-complete" event.
The code is as follows (topicname is the paramter):
dgrid.on("dgrid-refresh-complete", function(event) {
console.log("refresh-complete. Publishing to " + topicname);
require(["dojo/_base/connect"], function(connect) {
connect.publish(topicname, [event]);
});
});
However, I observed that mModule.generateRestChart() function was only invoked once when the dgrid was initiated. I expect the method being called whenever pagination is executed.
Same information is here:http://dojo-toolkit.33424.n3.nabble.com/get-data-refresh-notification-from-dgrid-with-jsonrest-datastore-td3998670.html
In the end, it turned out the dgrid-refresh-complete event will only be emitted once when dgrid is refreshed with loading the first page of data.
I did a workaround by customizing the pagination plugin for dgrid. The change I made was pretty simple: inside the Deferred block of gotoPage method of dgrid.extensions.Pagination, I added another emit of dgrid-navigation-complete event, which is a customized event by myself.
pointcuts before and after an ajax call in dojo?
I've been struggling in searching for proper pointcuts for dojo ajax calls.
The problem is that I'm using JsonRest with DGrid and pagination plugin -- actually it's not a "problem" because I chose to do so in order to shorten the development cycle for core frontend functionality. However, this combination doesn't offer the solution to several minor issues. For example, I want to show a loading picture, instead of just a loading message.
I decided to use aspect advice functions, which is a great piece of functionality available after dojo 1.7. It's not so easy to find the pointcuts to define advices. Reasons are here: http://dojo-toolkit.33424.n3.nabble.com/dojo-aspect-before-function-not-firing-td3985714.html#a3998683 )
In the end, I got some workaround to advise on _create method of dojo/request/xhr. But as I mentioned it's not a nice solution. Hopefully sitepen guru could expose some pointcuts in future releases.
The problem is that I'm using JsonRest with DGrid and pagination plugin -- actually it's not a "problem" because I chose to do so in order to shorten the development cycle for core frontend functionality. However, this combination doesn't offer the solution to several minor issues. For example, I want to show a loading picture, instead of just a loading message.
I decided to use aspect advice functions, which is a great piece of functionality available after dojo 1.7. It's not so easy to find the pointcuts to define advices. Reasons are here: http://dojo-toolkit.33424.n3.nabble.com/dojo-aspect-before-function-not-firing-td3985714.html#a3998683 )
In the end, I got some workaround to advise on _create method of dojo/request/xhr. But as I mentioned it's not a nice solution. Hopefully sitepen guru could expose some pointcuts in future releases.
Httpheaders to enable CORS filter for REST service used by dojo jsonrest data store
Dojo jsonrest datastore provides a simple way to implement ajax communication between dojo data grid (datagrid, enhancegrid, dgrid, or ondemandgrid) and the web service provider.
However, most times people would face CORS access issue when using jsonrest api.
Here's a few key points for the server side to enable the connection with jsonrest:
1. Access-Control-Allow-Origin, this header defines the allowed originate json request client. If not set, errors like "origin not allowed" will be thrown.
2. Access-Control-Allow-Headers, this header defines the allowed requesting headers, such as X-Requested-With, X-Range, Range, and so on. If not set, errors like "header not allowed" will be thrown.
3. Access-Control-Expose-Headers, this header defines the allowed response headers, such as Content-Range. If not set, error like "refused unsafe header" will be thrown.
X-Requested-With, X-Range, Range, Content-Range are the key headers attributes for jsonrest api to communciate with the server. They have to be enabled in the http header.
In order to enable them, we need to add/set a few headers from server side programmatically. Using java servlet/tomcat as an example, we can use server side filter to achieve this.
There's existing CORS filter library available at http://software.dzhuvinov.com/cors-filter-installation.html . However, it didn't work well for me. Implementing a custom CORS filter isn't that difficult as well. Here's the code:
Please feel free to comment on whether there's easier ways to do this.
However, most times people would face CORS access issue when using jsonrest api.
Here's a few key points for the server side to enable the connection with jsonrest:
1. Access-Control-Allow-Origin, this header defines the allowed originate json request client. If not set, errors like "origin not allowed" will be thrown.
2. Access-Control-Allow-Headers, this header defines the allowed requesting headers, such as X-Requested-With, X-Range, Range, and so on. If not set, errors like "header not allowed" will be thrown.
3. Access-Control-Expose-Headers, this header defines the allowed response headers, such as Content-Range. If not set, error like "refused unsafe header" will be thrown.
X-Requested-With, X-Range, Range, Content-Range are the key headers attributes for jsonrest api to communciate with the server. They have to be enabled in the http header.
In order to enable them, we need to add/set a few headers from server side programmatically. Using java servlet/tomcat as an example, we can use server side filter to achieve this.
There's existing CORS filter library available at http://software.dzhuvinov.com/cors-filter-installation.html . However, it didn't work well for me. Implementing a custom CORS filter isn't that difficult as well. Here's the code:
public class CorsFilter implements Filter {
After configuring this filter to apply to all requesting paths, it'll for sure enable those dojo jsonrest headers.public CorsFilter() { }public void init(FilterConfig fConfig) throws ServletException { }public void destroy() { }public void doFilter(ServletRequest request, ServletResponse response,FilterChain chain) throws IOException, ServletException {HttpServletResponse res=(HttpServletResponse)response;res.addHeader("Access-Control-Allow-Origin", "*");if(res.getHeader("Access-Control-Allow-Headers")==null) {res.addHeader("Access-Control-Allow-Headers", "Origin, X-Requested-With, X-Range, Range, Content-Type, Accept");}else{res.setHeader("Access-Control-Allow-Headers", "Origin, X-Requested-With, X-Range, Range, Content-Type, Accept,"+res.getHeader("Access-Control-Allow-Headers"));}res.addHeader("Access-Control-Expose-Headers","Accept-Ranges, Content-Encoding, Content-Length, Content-Range");chain.doFilter(request, response);}}
Please feel free to comment on whether there's easier ways to do this.
Friday, August 16, 2013
Cool loading gif generators
Here's the collection of sites used to create loading gifs:
http://loadinggif.com/
http://loadingapng.com/
http://cssload.net/
http://preloaders.net/
http://mentalized.net/activity-indicators/
http://loadinggif.com/
http://loadingapng.com/
http://cssload.net/
http://preloaders.net/
http://mentalized.net/activity-indicators/
Tuesday, August 06, 2013
customize the format for dojo widgets
Recently I just started the POC on a small reporting tool based on dojo (The major effort is still at the server side - controller & model layer, which sends JSON objects to be presented in the frontend.)
After going through a few documentation on the dojotoolkit website, I still could not find the information how I can customize the look and feel of widget. Good thing about javascript library is that you can always see the code. -- after browsing the contents of the dijit/themes/claro subdirectories, it looks not so difficult for me to find out how to do the customization, because the dojo class names are quite intuitive.
For example, if I'd like to change the style of the accordion title, I can use the following selection in the css file (menuPanel is the container of the accordion in my html file):
After going through a few documentation on the dojotoolkit website, I still could not find the information how I can customize the look and feel of widget. Good thing about javascript library is that you can always see the code. -- after browsing the contents of the dijit/themes/claro subdirectories, it looks not so difficult for me to find out how to do the customization, because the dojo class names are quite intuitive.
For example, if I'd like to change the style of the accordion title, I can use the following selection in the css file (menuPanel is the container of the accordion in my html file):
#menuPanel .dijitAccordionTitle{To change the title or tab label for tab container, the following can be used (centerPanel is something from my code, not part of dojo):
...
}
#menuPanel .dijitAccordionInnerContainerActive .dijitAccordionTitle, #menuPanel .dijitAccordionInnerContainerSelected .dijitAccordionTitle{
...
}
#centerPanel .dijitTabChecked {
...
}
#centerPanel .dijitTabContainerTop-tabs{
...
}
Things become easier if you dig a bit more :-)
Monday, July 29, 2013
Customizing dojo theme
Default dojo themes look quite boring. There's a quick way create your own themes by customizing existing ones. Here's the instructions to do so:
http://davidwalsh.name/dijit-theme
http://davidwalsh.name/dijit-theme
Friday, July 05, 2013
Enable static contents in Spring MVC
According to Spring MVC documentation http://static.springsource.org/spring/docs/3.2.2.RELEASE/spring-framework-reference/html/mvc.html#mvc-config-static-resources , adding the following bean configuration would do the work for DispatcherServlet serving static content:
1. mvc:annotation-driven needs to be added as well. Otherwise, the above configuration would block DispatcherServlet to dispatch other dynamic content to controllers.
2. Make sure request path for those static content is correct, i.e., including context path.
mapping="/resources/**" location="/public-resources/"/>
However, people tend to overlook the following 2 steps in order to make it completely work:1. mvc:annotation-driven needs to be added as well. Otherwise, the above configuration would block DispatcherServlet to dispatch other dynamic content to controllers.
2. Make sure request path for those static content is correct, i.e., including context path.
Saturday, May 25, 2013
Apache 2.4, Django 1.5, Python 3.3 configuration on Windows
It's not so easy to get Django 1.5 configured with Apache 2.4 on windows.
Most information/documentation related to such configuration is on Linux and on earlier versions of apache or django. Some of them might be misleading for the configuration on windows. For example, some say privilege needs to be changed, others say wsgi.py file needs to be changed.
Here I'd like to explain what I've done to make it work on windows.
1. Get mod_wsgi of the correct version for apache and python. (Believe me it's not so easy to compile it by yourself on windows.) Where to get it is described in my previous post.
2. Configure the module loading in apache http server by first adding the module to apache module directory and then add "LoadModule wsgi_module modules/mod_wsgi.so" to the httpd.conf file.
3. Add "WSGIScriptAlias /django "D:\...\webprojects\tutorial\tutorial\wsgi.py"" to the configuration file. This basically says, for any request with path "django", please use wsgi.py to handle it.
4. Add "WSGIPythonPath "D:\...\webprojects\tutorial"" to the conf file. This points out where python modules can be found. You can add multiple paths (separated by ";") to it.
5. Add the following directory directive:
<Directory "D:\...\webprojects\tutorial">
<Files wsgi.py>
Order deny,allow
Allow from all
</Files>
</Directory>
This allows the access to all wsgi.py files in the directory and its subdirectories.
6. Description of all the above steps can be found with a bit googling. However, after all these steps are done properly, you would still get http 403 access denied error. (In the error log, you'll see "AH01630: client denied by server configuration:").
It seems the "Allow" directive not working at all.
By checking http://httpd.apache.org/docs/2.4/mod/mod_access_compat.html#allow ; it can be seen "The directives provided by
So what still needs to be done is to replace "Allow from all" with "Require all granted".
After these 6 steps, you django 1.5 app can be running on apache 2.4 on windows.
Most information/documentation related to such configuration is on Linux and on earlier versions of apache or django. Some of them might be misleading for the configuration on windows. For example, some say privilege needs to be changed, others say wsgi.py file needs to be changed.
Here I'd like to explain what I've done to make it work on windows.
1. Get mod_wsgi of the correct version for apache and python. (Believe me it's not so easy to compile it by yourself on windows.) Where to get it is described in my previous post.
2. Configure the module loading in apache http server by first adding the module to apache module directory and then add "LoadModule wsgi_module modules/mod_wsgi.so" to the httpd.conf file.
3. Add "WSGIScriptAlias /django "D:\...\webprojects\tutorial\tutorial\wsgi.py"" to the configuration file. This basically says, for any request with path "django", please use wsgi.py to handle it.
4. Add "WSGIPythonPath "D:\...\webprojects\tutorial"" to the conf file. This points out where python modules can be found. You can add multiple paths (separated by ";") to it.
5. Add the following directory directive:
<Directory "D:\...\webprojects\tutorial">
<Files wsgi.py>
Order deny,allow
Allow from all
</Files>
</Directory>
This allows the access to all wsgi.py files in the directory and its subdirectories.
6. Description of all the above steps can be found with a bit googling. However, after all these steps are done properly, you would still get http 403 access denied error. (In the error log, you'll see "AH01630: client denied by server configuration:").
It seems the "Allow" directive not working at all.
By checking http://httpd.apache.org/docs/2.4/mod/mod_access_compat.html#allow ; it can be seen "The directives provided by
mod_access_compat have been deprecated by the new authz refactoring. Please see mod_authz_host." By following the link, you'll find that "Require" directive should be used instead.So what still needs to be done is to replace "Allow from all" with "Require all granted".
After these 6 steps, you django 1.5 app can be running on apache 2.4 on windows.
Thursday, May 09, 2013
Configure Apache 2.4 with Django (Python3.3) on windows
Installing/configuring Apache2.4 with Django on Linux is easy, while doing the same thing on windows can be tricky due to incompatible vc libs, win sdk libs, python libs and so on.
I've tried to compile the mod_wsgi several times, but faced some strange errors (I'm sure make file is updated properly). I found a good site where you can get compiled wsgi module: http://www.lfd.uci.edu/~gohlke/pythonlibs/#mod_wsgi .
Tuesday, October 30, 2012
Calling Apex web service - something additional to developer force apex quick start guide
In Apex code quick start guide from developer force, there's examples about the Book customized object. However, it's not clearly described about how to invoke a web service built with Apex.
Here I'll continue using the Book object as an example and explain how to call such web service with soapUI.
1. Create a web service for the Book example:
global class BookWebService{
webService static Id createBook(String name, Decimal price){
Book__c book=new Book__c(Name=name,Price__c=price);
insert book;
return book.Id;
}
}
2. Generate wsdl from the BookWebService class, and save it locally.
3. Generate partner wsdl from Develop --> API page, and save it locally.
4. In SoapUI, create a project by adding the above 2 wsdls.
5. Invoke login operation based on the partner wsdl with the credential to SFDC.
6. Copy the sessionid from the response and make the input for the createBook web service:
7. Invoke the web service, and get the following response:
8. Query SFDC with the returned Id:
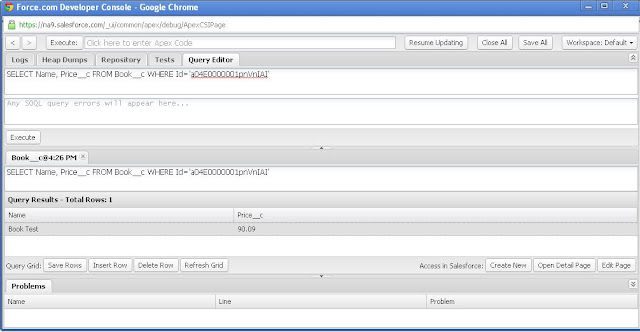
Here I'll continue using the Book object as an example and explain how to call such web service with soapUI.
1. Create a web service for the Book example:
global class BookWebService{
webService static Id createBook(String name, Decimal price){
Book__c book=new Book__c(Name=name,Price__c=price);
insert book;
return book.Id;
}
}
2. Generate wsdl from the BookWebService class, and save it locally.
3. Generate partner wsdl from Develop --> API page, and save it locally.
4. In SoapUI, create a project by adding the above 2 wsdls.
5. Invoke login operation based on the partner wsdl with the credential to SFDC.
<soapenv:Envelope xmlns:soapenv="http://schemas.xmlsoap.org/soap/envelope/" xmlns:urn="urn:partner.soap.sforce.com">
   <soapenv:Header>
   </soapenv:Header>
   <soapenv:Body>
      <urn:login>
         <urn:username>zzzzzzzzzzz</urn:username>
         <urn:password>xxxxxxxxxxx</urn:password>
      </urn:login>
   </soapenv:Body>
</soapenv:Envelope>
6. Copy the sessionid from the response and make the input for the createBook web service:
<soapenv:Envelope xmlns:soapenv="http://schemas.xmlsoap.org/soap/envelope/" xmlns:book="http://soap.sforce.com/schemas/class/BookWebService">
   <soapenv:Header>
      <book:AllowFieldTruncationHeader>
         <book:allowFieldTruncation>true</book:allowFieldTruncation>
      </book:AllowFieldTruncationHeader>
      <book:SessionHeader>
         <book:sessionId>00DE0000000adhV!ARQAQLsTZiERi36QEprxQx0F_xI826qAM9W4AQNwCdMnKO18GIrjijaRIvjFsnxYF148Rr_4EFknbzjwerkFhW7enghQPRCN</book:sessionId>
      </book:SessionHeader>
   </soapenv:Header>
   <soapenv:Body>
      <book:createBook>
         <book:name>Book Test</book:name>
         <book:price>100.10</book:price>
      </book:createBook>
   </soapenv:Body>
</soapenv:Envelope>
7. Invoke the web service, and get the following response:
<soapenv:Envelope xmlns:soapenv="http://schemas.xmlsoap.org/soap/envelope/" xmlns:book="http://soap.sforce.com/schemas/class/BookWebService">
   <soapenv:Header>
      <book:AllowFieldTruncationHeader>
         <book:allowFieldTruncation>true</book:allowFieldTruncation>
      </book:AllowFieldTruncationHeader>
      <book:SessionHeader>
         <book:sessionId>00DE0000000adhV!ARQAQLsTZiERi36QEprxQx0F_xI826qAM9W4AQNwCdMnKO18GIrjijaRIvjFsnxYF148Rr_4EFknbzjwerkFhW7enghQPRCN</book:sessionId>
      </book:SessionHeader>
   </soapenv:Header>
   <soapenv:Body>
      <book:createBook>
         <book:name>Book Test</book:name>
         <book:price>100.10</book:price>
      </book:createBook>
   </soapenv:Body>
</soapenv:Envelope>
8. Query SFDC with the returned Id:

Friday, April 13, 2012
A practical article about how to use svn
A good article about best practices in practice regarding svn: http://blog.evanweaver.com/2007/08/15/svn-branching-best-practices-in-practice/
However, instead of updating branch and replacing trunk with branch, I'm in favor of always merging the branch into the trunk. The commands listed in the post are quite useful.
However, instead of updating branch and replacing trunk with branch, I'm in favor of always merging the branch into the trunk. The commands listed in the post are quite useful.
Subscribe to:
Posts (Atom)